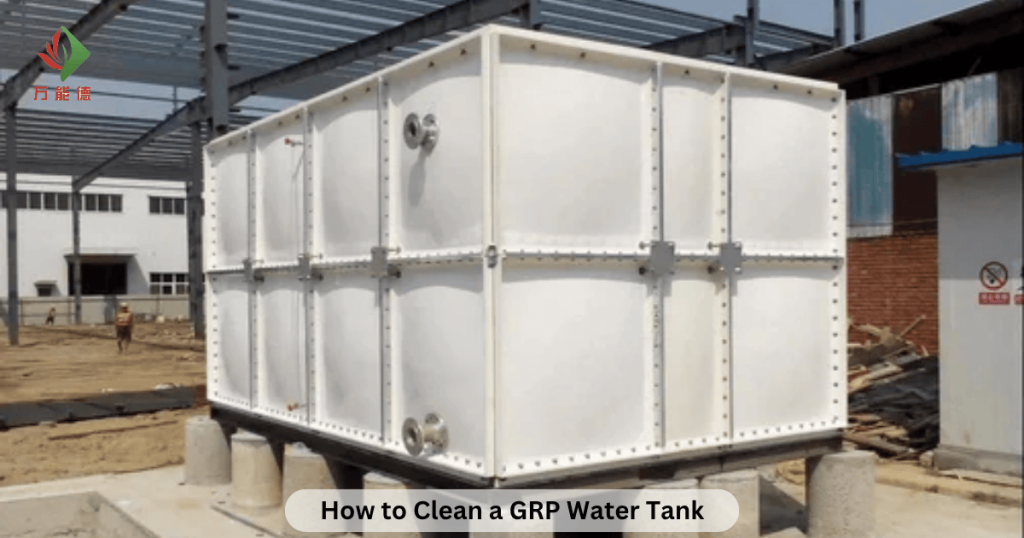
Water is the essence of life, but clean water doesn’t come automatically — it depends on how well we store and maintain it. Whether you use water for domestic, commercial, or industrial purposes, the cleanliness of your water storage tank directly affects its safety. A GRP (Glass Reinforced Plastic) water tank is an excellent choice for storing water because it is durable, corrosion-resistant, and easy to maintain. However, even the best tank can become a source of contamination if not cleaned regularly.
This article explains how to clean a GRP water tank in a step-by-step way, including what tools to use, the precautions to take, and how to ensure your tank stays clean for a long time.
Understanding GRP Water Tanks
Before diving into the cleaning process, it’s important to understand what makes a GRP water tank unique. GRP stands for Glass Reinforced Plastic, a composite material made by combining plastic resin with fine glass fibers. This creates a tank that is strong, lightweight, and resistant to rust, chemicals, and environmental wear. Because of these advantages, GRP tanks are commonly used in households, industries, and even municipal water systems.
One of the most significant features of a GRP water tank is its smooth inner surface, which reduces the likelihood of algae and bacteria forming. However, this doesn’t mean it never needs cleaning. Over time, dust, sediment, and microorganisms can still build up, especially if the tank is not covered properly or if water stays stagnant for long periods. Therefore, regular cleaning — ideally once or twice a year — is necessary to ensure the tank continues providing safe, odor-free water.
Why Cleaning a GRP Water Tank Is Important
Many people assume that since the tank is sealed, the water inside remains clean automatically. Unfortunately, that’s not the case. Water quality can deteriorate for several reasons, such as exposure to sunlight, accumulation of organic matter, or bacterial growth.
If a GRP water tank is left uncleaned for too long, several problems can arise. The first and most obvious issue is the growth of algae and fungi. These microorganisms thrive in moist environments and can turn the tank walls greenish, producing a foul odor and unpleasant taste in the water. Another major issue is bacterial contamination, particularly from bacteria such as E. coli and Legionella, which can cause waterborne diseases.
Additionally, sediment and mineral deposits gradually settle at the bottom of the tank. These sediments can clog filters and pipes, reducing water pressure and overall system efficiency. Even worse, they can corrode the tank’s base over time. A clean tank ensures that the water remains safe, clear, and suitable for any use — from drinking and cooking to washing and industrial processes.
To summarize, cleaning your GRP water tank:
-
Prevents bacterial and algae growth
-
Eliminates unpleasant odors and tastes
-
Improves water flow and system efficiency
-
Extends the lifespan of the tank
-
Ensures compliance with hygiene and safety standards
Tools and Materials Required for Cleaning
Before starting the cleaning process, preparation is key. Having all the necessary tools and materials ready will make the job easier and safer. Here’s what you’ll need:
-
Protective rubber gloves and safety glasses to protect your hands and eyes from cleaning agents.
-
Face mask to avoid inhaling chlorine fumes or dust.
-
Buckets of clean water for rinsing and mixing solutions.
-
Laundry detergent or mild cleaning soap as a base cleaning agent.
-
Baking soda for removing stains and neutralizing odors.
-
Chlorine tablet or bleach for disinfection.
-
Bristle brush or sponge to scrub the surfaces.
-
Power washer or hose for thorough rinsing.
-
Vacuum cleaner or suction machine to remove standing water.
-
Microfiber cloths for drying.
-
Flashlight to check corners and hidden spots.
Having all these materials on hand ensures that you can move through each cleaning stage efficiently without interruptions.
Step-by-Step Process: How to Clean a GRP Water Tank
Now that you’re fully equipped, it’s time to get to work. Cleaning a GRP tank may sound like a complex process, but when done methodically, it’s straightforward and effective. Let’s go step-by-step.
Step 1: Dewater the Tank
The first step is to completely drain the tank. Turn off the main water inlet and open the outlet or drain valve to let all the stored water out. If your tank doesn’t have a drain valve, use a hose or submersible pump to remove as much water as possible. Once most of the water is out, use a wet vacuum or suction machine to remove any remaining puddles.
Direct the drained water to a safe area to avoid erosion or flooding. Leaving even a small amount of stagnant water can interfere with cleaning, so make sure the tank is completely dry before proceeding.
Step 2: Prepare the Cleaning Solution
After emptying the tank, prepare a mild but effective cleaning mixture. Combine hot water with a small amount of laundry detergent or a mild soap. For better results, add a few tablespoons of baking soda to remove odor and loosen any mineral deposits.
To disinfect, dissolve a chlorine tablet (around 50 ppm) or add a small quantity of household bleach to the mix. Stir thoroughly and pour the solution into a bucket or spray bottle. Avoid strong chemicals like acids or solvents because they can damage the GRP’s protective layer.
Step 3: Scrub the Tank Walls
Dip a bristle brush or sponge into the cleaning mixture and start scrubbing the walls of the tank. Work from the top downward in circular motions to remove dirt, algae, and buildup. Pay special attention to seams, joints, and corners, as these areas often trap more debris.
If the tank is large, a power washer can save time. Adjust the pressure to avoid damaging the internal surface while ensuring that the dirt is thoroughly removed. This step may take some time, but it is crucial for restoring the tank’s cleanliness and ensuring that the water inside will remain uncontaminated later.
Step 4: Clean the Bottom and Internal Parts
Once the walls are clean, move to the bottom of the tank. Scrub the base thoroughly using the same cleaning mixture. The base often collects sediment, sand, and mineral scale, so you may need to apply extra pressure or repeat the scrubbing a few times.
Check all internal fittings, such as pipes, inlets, and float valves, for dirt or buildup. These parts can also harbor bacteria if neglected. Use a small brush or cloth to clean them gently. If there are any stubborn stains or greasy residues, adding a small amount of acetone to your cleaning solution can help dissolve them effectively.
Always wear gloves and safety glasses during this process to protect yourself from splashes and cleaning agents.
Step 5: Rinse the Tank Thoroughly
After scrubbing, it’s essential to rinse away every trace of detergent and dirt. Fill the tank with clean water and use a hose or power washer to flush the surfaces. Swirl the water around and drain it through the outlet. Repeat this rinsing process at least two to three times until no foam or residues are visible.
You can also rinse once using hot water to disinfect the tank further and help loosen any remaining dirt. Never skip this step — leftover cleaning solution can affect the taste and quality of stored water.
Step 6: Dry the Tank Completely
Once rinsing is complete, you need to ensure the tank is completely dry before refilling. Any leftover moisture can promote the growth of mold or bacteria. Use a vacuum to remove remaining water droplets, then wipe the interior with a clean microfiber cloth. Keep the tank lid open for several hours to allow fresh air to circulate inside.
This drying stage also gives you the perfect opportunity to inspect the tank for cracks or leaks. Catching minor issues early can save you from costly repairs later on.
Optional Step: Disinfecting the Tank
If your GRP tank is used for drinking water, it’s a good idea to perform an additional disinfection step after cleaning. Prepare a mixture of 1 part bleach to 100 parts water (1%) and pour it into the tank. Let it sit for about one to two hours to ensure all bacteria are neutralized. Then, drain the solution and rinse the tank thoroughly with clean water to remove any residual chlorine.
This extra precaution ensures your stored water remains microbiologically safe for consumption.
Maintenance Tips for a Cleaner GRP Tank
Cleaning your GRP tank thoroughly once or twice a year is important, but maintaining it in between cleanings is equally crucial. With simple habits, you can prevent dirt buildup and minimize the need for frequent deep cleans.
Here are a few practical maintenance tips:
-
Always keep the tank lid tightly closed to prevent dust, insects, and sunlight from entering.
-
Install a first-flush diverter if you’re collecting rainwater, so the first dirty flow doesn’t enter the tank.
-
Periodically add chlorine tablets (in controlled amounts) to keep bacteria from developing.
-
Inspect the tank every few months for signs of cracks, leaks, or discoloration.
-
Avoid using harsh chemicals or solvents, as they can degrade the GRP’s surface over time.
-
If the tank has been unused for a long time, flush it completely before filling it again.
These small but consistent actions help ensure that your GRP tank continues providing clean and safe water all year long.
Common Mistakes to Avoid During Cleaning
Even with the right process, some common mistakes can reduce the effectiveness of your cleaning or even damage the tank. Be mindful to avoid these:
-
Using metal brushes or abrasive pads that can scratch the inner surface.
-
Mixing too much bleach can weaken the GRP coating.
-
Forgetting to rinse thoroughly, leaving detergent or chlorine residues behind.
-
Cleaning without protective gloves or eyewear risks skin or eye irritation.
-
Refilling the tank before it’s completely dry, encourage mold or bacterial regrowth.
By following the correct procedure and avoiding these errors, your GRP tank will remain clean, safe, and long-lasting.
Final Thoughts
Cleaning a GRP water tank might seem like a demanding job, but in reality, it’s a straightforward routine when done properly. The key is consistency and thoroughness. A clean tank ensures that every drop of water you use is pure, safe, and free from harmful contaminants. It also prolongs the tank’s life and prevents issues like odors, corrosion, or bacterial growth.
To recap the process:
First, dewater the tank completely, then prepare a mild cleaning solution. Scrub the walls and base to remove all dirt and residue, rinse several times with clean water, and allow it to dry fully. If your tank holds drinking water, finish with a light disinfection process before refilling.
Clean water is essential for good health, and it starts with a clean storage system. By setting aside just a few hours once or twice a year, you can ensure that your GRP water tank remains in perfect condition, serving you efficiently for many years. A little effort goes a long way in maintaining hygiene, protecting your health, and preserving one of life’s most valuable resources — clean water.